

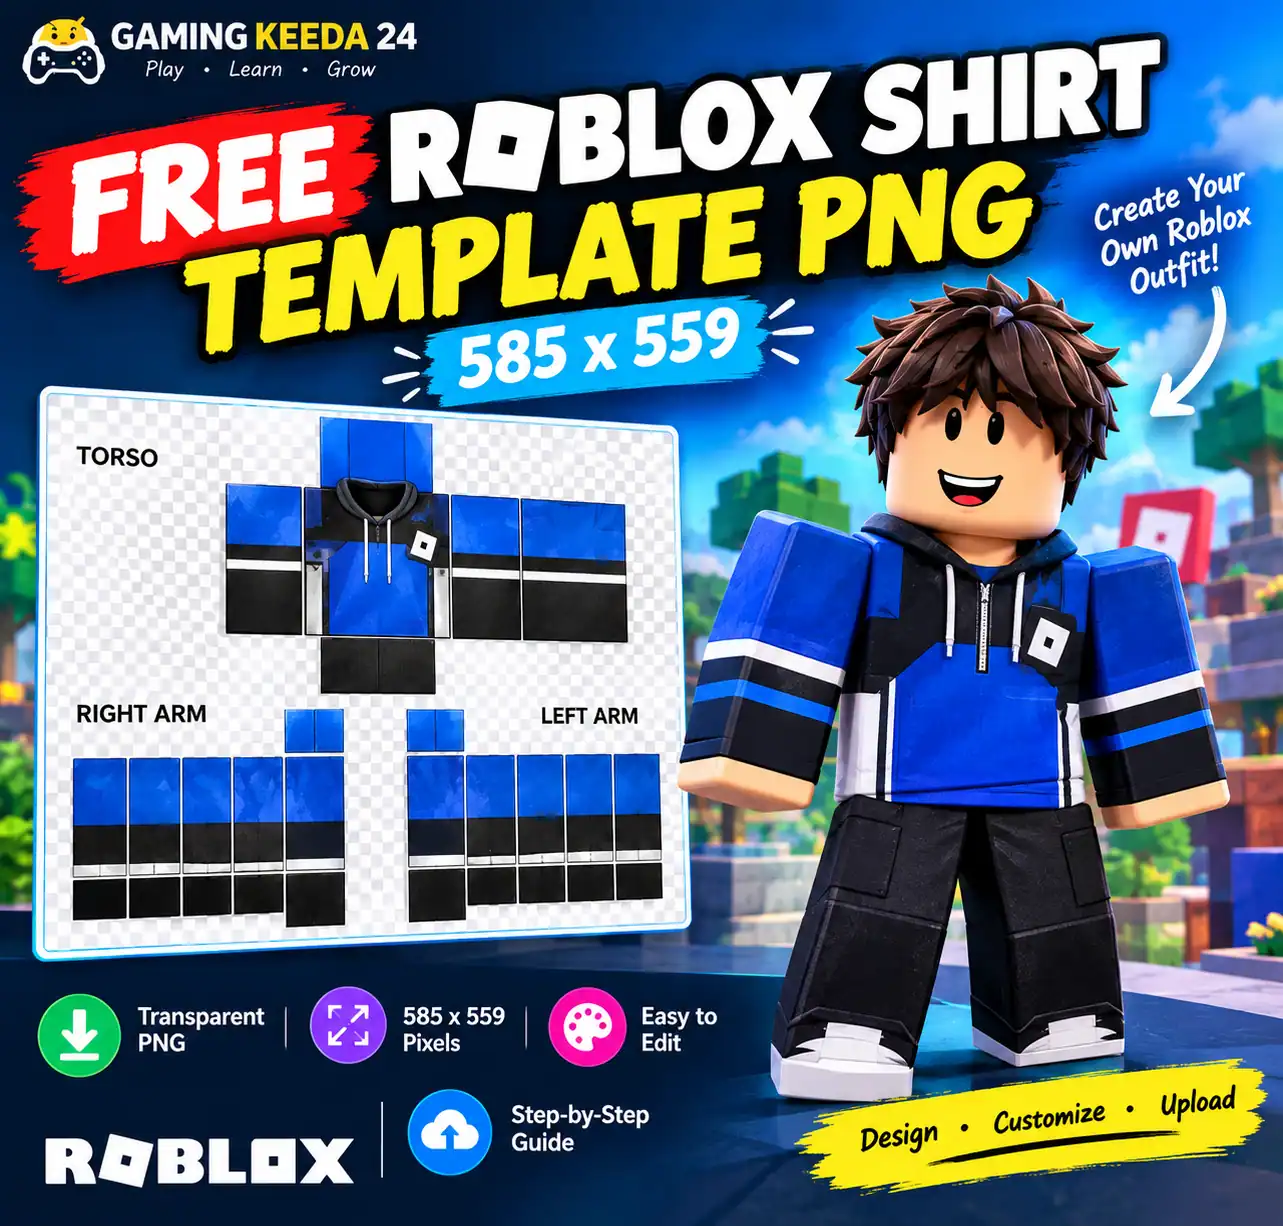
Want to create your own Roblox shirt but do not know where to start? A transparent Roblox shirt template is one of the easiest ways to design custom clothing for your avatar. You can use it to create hoodies, T-shirts, jackets, uniforms, gaming outfits, and many other clothing styles.
In this guide, I will explain how to find a Roblox shirt template transparent PNG in 585×559 size, how to edit it for free, how to keep the background transparent, and how to upload your finished design to Roblox.
At Gaming Keeda 24, our goal is to make gaming tools and tutorials simple enough for beginners while still providing the details experienced creators need.
Quick Answer: Roblox Shirt Template PNG 585×559
If you need the template immediately, here are the essential details.
- Image dimensions: 585 × 559 pixels
- File format: PNG recommended for transparency
- Background: Transparent outside the clothing panels
- Purpose: Classic Roblox shirt design
- Editing tools: Photopea, Photoshop, GIMP, or ibis Paint
- Upload location: Roblox Creator Hub
You can start here:
Free template resource: Get the Roblox Shirt Template PNG (585×559)
Official Roblox instructions: Roblox Creator Hub – Classic Clothing
The first link provides a template resource with blank and guide versions. The second explains Roblox’s official clothing layout and upload process. <escape>[1]</escape> <escape>[2]</escape>
What Is a Roblox Shirt Template?
A Roblox shirt template is a flat image that contains the different sections of a classic shirt. When Roblox applies this image to your avatar, the individual sections wrap around the character’s torso and arms.
Think of it like a paper pattern used to make clothes. Instead of cutting fabric, you add colours, designs, logos, and patterns to specific areas of an image.
A classic shirt template contains sections for:
- The front of the torso
- The back of the torso
- The left and right sides
- The tops and bottoms of the torso
- The front, back, and sides of both arms
- The tops and bottoms of the arms
All these sections work together to create one wearable item.
Why does the 585×559 size matter?
The template uses a specific layout, so resizing the canvas can move its sections out of alignment. This may cause your design to appear stretched, misplaced, or incorrectly wrapped around your avatar.
For a standard classic shirt, keep the image at exactly 585 pixels wide and 559 pixels high when using a template designed for those dimensions.
Download a Transparent Roblox Shirt Template
Follow these steps to get started.
- Open the Roblox shirt template resource.
- Find the download option for the blank template or the template package.
- Download the file to your computer or device.
- If the download is a ZIP file, extract it first.
- Open the blank PNG in your preferred image editor.
- Keep a separate copy of the original template before making changes.
If you prefer official instructions, visit the Roblox Creator Hub and look for the classic shirt template resources.
Important: Choose a blank template for your final design. A guide template may contain labels or coloured guides that should not appear on your finished shirt.
How to Use a Roblox Shirt Template in PNG Format
You do not need expensive software to create your first Roblox shirt. A free browser-based editor is enough for many designs.
Step 1: Open the template in an image editor
For a beginner-friendly option, try Photopea.
Photopea works in a web browser and supports PNG files and transparent layers. You can also use Photoshop, GIMP, or another image editor that preserves transparency.
Open your downloaded template and check the canvas dimensions before editing.
Step 2: Add a new layer
Create a new layer above the template guide.
This lets you draw your clothing design without permanently changing the original template. Keep the guide visible while working so you can identify where each part of the shirt belongs.
Step 3: Design the front of the shirt
The front torso panel is a good place to begin.
You can add:
- A plain black or white shirt design
- A colourful gaming hoodie
- A sports jersey
- A team name or logo
- Stripes, pockets, or other clothing details
Make sure your artwork fits within the correct panel. If your design continues around the sides, position the neighbouring panels carefully so the pattern lines up when the shirt wraps around the avatar.
Step 4: Design the back and sleeves
Do not forget the back of the shirt. You can add a player name, a number, a logo, or a matching pattern.
Next, customise the arm panels. These sections can represent sleeves, cuffs, stripes, or other details.
Keep in mind that the template is a flat layout. A design that looks correct on the image may need adjustments after you test it on a 3D avatar.
Step 5: Keep the background transparent
This is one of the most important steps.
The transparent areas outside the clothing panels should remain transparent. If you fill the entire canvas with a solid colour, that colour may appear in places where you intended the avatar’s skin to remain visible.
To preserve transparency:
- Keep the original template’s transparent areas intact.
- Hide or remove the guide layer before exporting.
- Do not add a solid background behind the shirt.
- Export the finished image as a PNG.
- Reopen the exported file to confirm that transparency is still present.
Remember that a white-looking area is not always transparent. In your image editor, look for a checkerboard background or use a transparency checker to verify it.
Step 6: Export the finished PNG
Before saving, check the following:
- The canvas is still 585 × 559 pixels.
- The clothing panels are in the correct positions.
- The guide labels are hidden.
- The background remains transparent.
- The file is saved in PNG format.
Keep your original editable project file as well, if your editor supports one. This makes future changes much easier.
Roblox Shirt Template Size Guide
The template contains panels of different sizes. These dimensions help explain how the flat image maps onto the avatar.
| Clothing section | Typical panel dimensions |
|---|---|
| Torso front and back | 128 × 128 px |
| Torso sides | 64 × 128 px |
| Torso top and bottom | 128 × 64 px |
| Arm front, back, and sides | 64 × 128 px |
| Arm top and bottom | 64 × 64 px |
These are the dimensions of individual template sections, not the dimensions of the full image. See the official Roblox clothing documentation for the layout and examples.
How to Upload Your Custom Shirt to Roblox
Once your PNG is ready, you can upload it through Roblox’s creator tools.
- Sign in to your Roblox account.
- Open the Roblox Creator Hub.
- Navigate to the avatar items or classic clothing creation area.
- Choose the option to create or upload a classic shirt.
- Select your finished PNG file.
- Enter the required item name and other information.
- Submit it for Roblox’s review, following the current instructions.
Roblox may charge an upload fee, and its creator eligibility requirements can apply. Check the current requirements and fees before submitting your design.
Before uploading: Test the shirt on an avatar whenever possible. Check the front, back, sides, and sleeves for gaps or misaligned patterns. Approval is not guaranteed, and your item must comply with Roblox’s content rules.
Classic Shirt vs. Classic T-Shirt: What Is the Difference?
These two clothing types are easy to confuse, especially when searching for templates.
| Feature | Classic shirt | Classic T-shirt |
|---|---|---|
| Template | Full clothing layout | Single square image |
| Covers | Torso and arms | Front torso graphic |
| Common use | Hoodies, jackets, jerseys, full shirt designs | Logos, symbols, simple chest graphics |
| Editing | Multiple connected panels | One main image |
| Template size | 585 × 559 for the standard layout | Square image, such as 512 × 512 |
If you want a complete shirt with sleeves, use a classic shirt template. If you only want a logo or graphic on the front of an avatar, a classic T-shirt may be what you need. Roblox documents these as separate asset types. <escape>[3]</escape>
Best Free Tools for Editing Roblox Shirt Templates
You can choose an editor based on your device and experience.
Photopea
A convenient browser-based option for opening PNGs, working with layers, and exporting transparent images. It is useful if you do not want to install desktop software.
GIMP
A free desktop image editor with layers, selection tools, and PNG export support. It is a good choice for creators who want more control over their designs.
Adobe Photoshop
A professional image editor with extensive design tools. It is useful for more advanced clothing artwork, although a paid plan may be required.
ibis Paint
A drawing application worth considering if you prefer creating artwork on a compatible phone or tablet. Check that your version supports the canvas size and transparent PNG export you need.
Common Roblox Shirt Template Mistakes to Avoid
Even a good design can look wrong in Roblox if the file is prepared incorrectly.
1. Resizing the canvas
Changing the image dimensions can misalign the clothing panels. Keep the original template size throughout your workflow.
2. Exporting with a solid background
A white background is not the same as transparency. Make sure your exported PNG retains its alpha channel.
3. Leaving template labels visible
Labels and guide colours are useful while designing but can become part of the finished artwork if you leave them visible.
4. Forgetting the side panels
If you only design the front and back, the sides may look unfinished. Check every panel that appears on the avatar.
5. Ignoring seams
Patterns that cross from the front to the sides or sleeves need to line up across neighbouring panels. Test your design on the avatar before publishing.
6. Using the wrong clothing template
A classic shirt template is not interchangeable with every other Roblox clothing format. Make sure you are creating the type of asset you actually want.
Recommended YouTube Tutorials
If you learn better by watching someone demonstrate the process, these are useful places to start.
1. Official Roblox classic clothing tutorial
The Roblox Creator Hub includes instructional material on creating and testing classic clothing.
Open the official tutorial and documentation
2. How to make a Roblox shirt using Photopea
Find Photopea Roblox shirt template tutorials on YouTube
Look for a tutorial that demonstrates layers, the classic shirt panel layout, and transparent PNG export.
3. Roblox shirt template 585×559 tutorial
Search YouTube for 585×559 Roblox shirt template guides
Choose a recent video that uses the correct template dimensions and shows how to test the result on an avatar. We recommend checking the instructions against Roblox’s official documentation rather than relying on an older tutorial alone.
Frequently Asked Questions
What is the correct size for a Roblox shirt template?
A standard classic shirt template uses a 585 × 559 pixel canvas. Keep the original dimensions when editing a template designed for that layout.
Where can I download a Roblox shirt template transparent PNG?
You can start with this 585 × 559 shirt template resource or consult the official Roblox Creator Hub.
Can I make a Roblox shirt for free?
You can design a shirt using free tools such as Photopea or GIMP. Uploading an item to Roblox may require a fee, and publishing or selling items can involve additional eligibility requirements.
Can I use a phone to edit the template?
Yes, if your image editor supports the required canvas dimensions, layers, and transparent PNG export. A larger screen can make aligning the panels easier, but a phone can work for simpler designs.
Why does my Roblox shirt look wrong after uploading?
Common reasons include an incorrect canvas size, artwork on the wrong panels, visible guide layers, and seams that do not line up. Review the template and test the design on an avatar before making it public.
Can I use a shirt template for Roblox pants?
Roblox has a separate classic pants layout. Use the appropriate pants template rather than assuming a shirt design will work correctly as pants.
Does a transparent PNG mean the entire image should be invisible?
No. The clothing artwork should remain visible in its designated panels, while areas intended to be transparent should allow the avatar’s skin to show through.
Final Thoughts
Creating a custom Roblox shirt is easier when you start with the correct template. Download a 585 × 559 PNG, design on separate layers, preserve transparency, and check every panel before uploading it.
At Gaming Keeda 24, we recommend using the official Roblox documentation alongside your preferred editing tool. This helps you avoid common mistakes and gives you a better chance of getting the result you want.
Ready to create your own Roblox outfit? Start with the transparent shirt template, open it in Photopea or another image editor, and turn your idea into a custom design.

